R-Car S4 System Evaluation Board SPIDER
Prerequisites
Hardware:
Software:
- Ubuntu 20.04 LTS (Other OS currently are not tested.)
- picocom (can be installed with command)
Please execute the following command to install picocom if not installed yet.
sudo apt install picocom
Prepare your work directory
Create the work directory.
$ mkdir -p <directory for work>
$ cd <directory for work>
$ export WORK_BASE=$(pwd)
Obtain R-Car S4 SDK common tool ubuntu v3.11.0. If the newest release is published more than R-Car S4 SDK v3.11.0 on web site, please use the latest one. In that case, the description of version information should be replaced to its version.

Unpack and extract the necessary files with the following command. Note: "download directory" is the path where "R-Car S4 SDK common tool for ubuntu v3.11.0" was downloaded.
$ cp <download directory>/rcar_tool_ubuntu_v3.11.0.zip ${WORK_BASE}
$ unzip rcar_tool_ubuntu_v3.11.0.zip
$ cd rcar_tool_ubuntu_v3.11.0
$ tar xf rcar-xos_tool_hypervisor_v3.9.0.tar.gz -O os/xen/R-Car_S4_Xen_0_8_6.zip > R-Car_S4_Xen_0_8_6.zip
$ mv R-Car_S4_Xen_0_8_6.zip ../.
$ cd ..
$ unzip -p R-Car_S4_Xen_0_8_6.zip R-Car_S4_Xen/bin/Flash_Boot.zip > Flash_Boot.zip
$ unzip Flash_Boot.zip
$ chmod +x Flash_Boot/burn.sh Flash_Boot/cpld-control-1.7.1 Flash_Boot/ipl_burning.py
$ mkdir R-Car_S4_Xen
$ unzip -j R-Car_S4_Xen_0_8_6.zip R-Car_S4_Xen/bin/dom0/* -d R-Car_S4_Xen/dom0
$ unzip -j R-Car_S4_Xen_0_8_6.zip R-Car_S4_Xen/bin/domd/* -d R-Car_S4_Xen/domd
$ unzip -j R-Car_S4_Xen_0_8_6.zip R-Car_S4_Xen/bin/domu/* -d R-Car_S4_Xen/domu
Edit “burn.sh” in Flash_Boot directory as following.
$ sed -i.bak -e 's|^./|#\0|' -e "s|USB_PORT=|\0/dev/ttyUSB0|" burn.sh
Write U-Boot and IPL
This chapter describes how to flash up-to-date firmware on board. Please install pyserial on Host PC.
sudo pip3 install pyserial
sudo pip3 install pyserial –-upgrade
-
Turn off the power of the target board (SW11).
-
Connect [CN20] on the target board to the Host PC with USB cable.
-
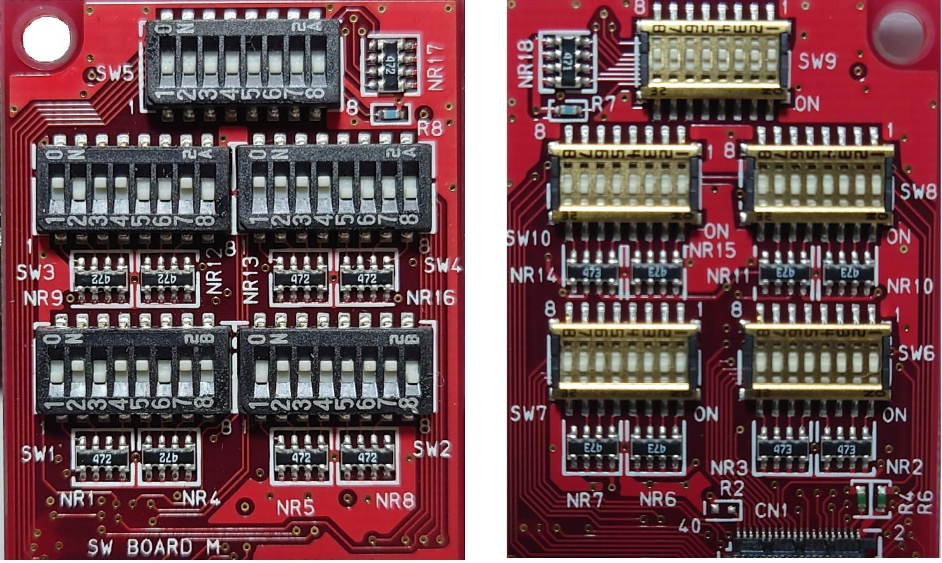
please use "Mode Switch Board" instead of "Switch on CPU Board/CPLD".
Mode Switch Board
- Top Side is on the left
- Bottom Side is on the right

Dipsw default settings
No1 No2 No3 No4 No5 No6 No7 No8 SW1 OFF ON OFF ON ON OFF ON ON SW2 OFF ON ON ON ON ON ON OFF SW3 ON OFF ON ON OFF OFF ON OFF SW4 ON ON ON ON OFF OFF OFF OFF SW5 OFF OFF OFF OFF OFF OFF OFF OFF SW6-8 ON ON ON ON ON ON ON ON SW9 OFF OFF OFF OFF OFF OFF OFF OFF SW10 ON ON ON ON ON ON ON ON -
Set SW1 on the "Mode Switch Board" as follows to set SCIF Download mode.
No1: OFF
No2: ON
No3: OFF
No4: ON
No5: OFF
No6: OFF
No7: OFF
No8: OFF -
Turn on (SW11) target board.
-
Execute burn.sh Make sure the target board [CN20] is connected and no picocom console is attached to its serial port.
 $ cd ${WORK_BASE}/Flash_Boot
$ sudo ./burn.sh -
Turn off (SW11) target board.
-
Set SW1 on the "Mode Switch Board" as follows.
No1: OFF
No2: ON
No3: OFF
No4: ON
No5: ON
No6: OFF
No7: ON
No8: ON
Write Aos image to eMMC
In the following steps, the Aos Image is written to eMMC. In order to write an Aos image to eMMC, target board be booted with Xen.
FTP/NFS booting
In the following steps, it is assumed that TFTP server and NFS server are installed in your Linux Host PC.
Prepare TFTP server
Below is an example directory structure on the TFTP server:
<path to TFTP directory>
  └── dom0
      ├── Image
      ├── r8a779f0-spider-xen.dtb
      ├── uInitramfs
      ├── uirfs.sh
      ├── xenpolicy-spider
      └── xen-uImage
Prepare NFS root file system
Below is an example directory structure on the NFS server:
<NFS_SRV_DIR>
   ├── domd
   │    └── rcar-image-minimal-spider.tar.bz2
   └── domu
        └── rcar-image-minimal-spider.tar.bz2
NFS server setting example (/etc/exports)
/srv/domd 192.168.1.0/24(rw,sync,no_root_squash,no_subtree_check,insecure,nohide)
localhost(rw,sync,no_subtree_check)
/srv/domu
192.168.1.0/24(rw,sync,no_root_squash,no_subtree_check,insecure,nohide)
localhost(rw,sync,no_subtree_check)
STEP 1. Create domain directory:
$ cp ${WORK_BASE}/R-Car_S4_Xen/dom0/* ${TFTP_PATH}/dom0
$ chmod -R 755 ${TFTP_PATH}/dom0
STEP 2. Prepare Dom0 and Xen image:
$ cp ${WORK_BASE}/R-Car_S4_Xen/dom0/* ${TFTP_PATH}/dom0
$ chmod -R 755 ${TFTP_PATH}/dom0
STEP 3. Prepare DomD rootfs:
$ sudo tar -xf ${WORK_BASE}/R-Car_S4_Xen/domd/rcar-image-minimal-spider.tar.bz2 -C ${ROOTFS_PATH}/domd
$ sudo chmod 755 ${ROOTFS_PATH}/domd
STEP 4. Prepare DomU rootfs:
$ sudo tar -xf ${WORK_BASE}/R-Car_S4_Xen/domu/rcar-image-minimal-spider.tar.bz2 -C ${ROOTFS_PATH}/domu
$ sudo chmod 755 ${ROOTFS_PATH}/domu
Set U-Boot environment variables
Start a terminal on the Host PC. Select the serial device connected to target board. In this case, ttyUSB0 is used.
picocom -b 1843200 -d 8 -y n -p 1 -f n /dev/ttyUSB0
Turn on (SW11) or reset (SW15) target board.
Hit any key to stop autoboot:
Wait until you see the above message in the terminal and press any key. If you have no properly set boot device, you will fall into u-boot command line without pressing a key. You should see the prompt of u-boot command line.
=>
In accordance with conditions of use, set and save environment variable.
[!NOTE]
Highlights information that users should take into account, even when skimming.
Easy to maintain open source documentation websites.
— Docusaurus
Some content with Markdown syntax. Check this api.